.png)

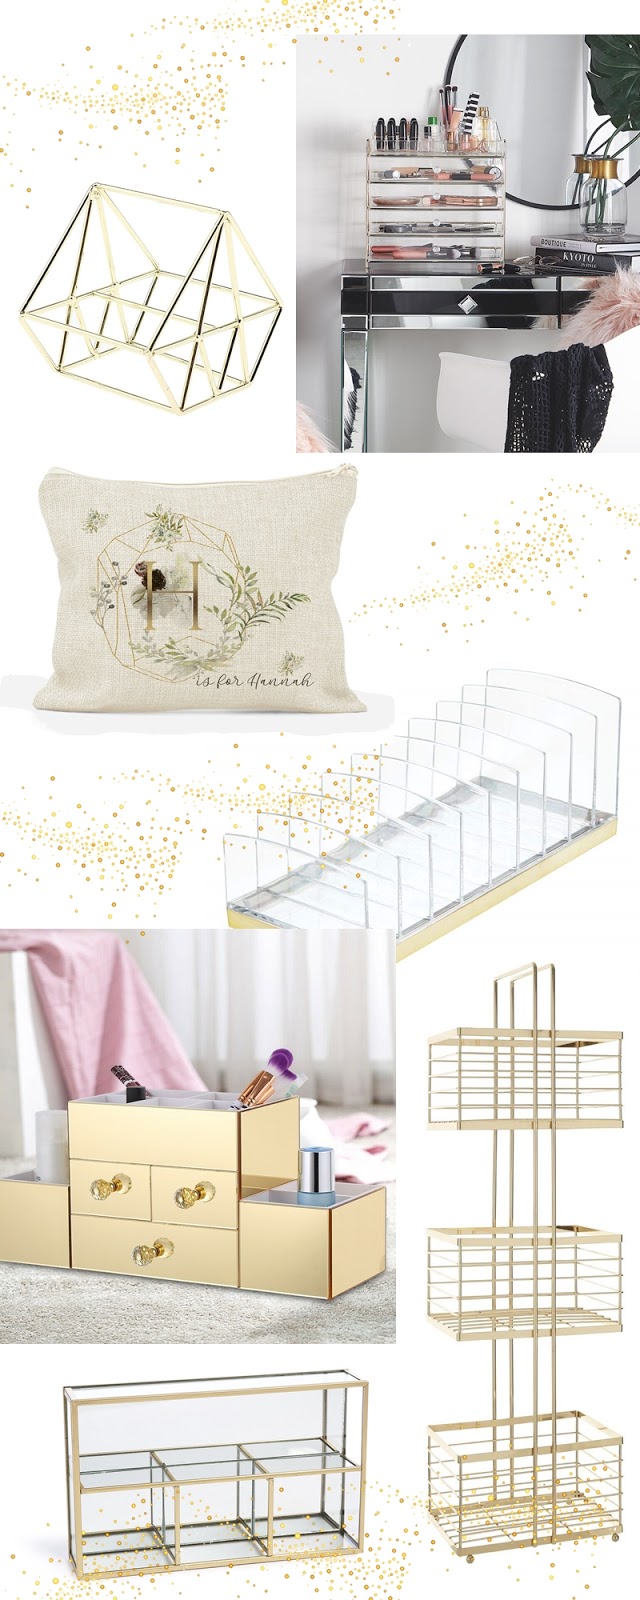
If you are here then you most likely own makeup products you want to keep neat and tidy and in some kind of order. The best way to do this, of course, is with a makeup organizer; from small units to makeup towers that can hold a huge amount it's the ideal makeup storage solution.
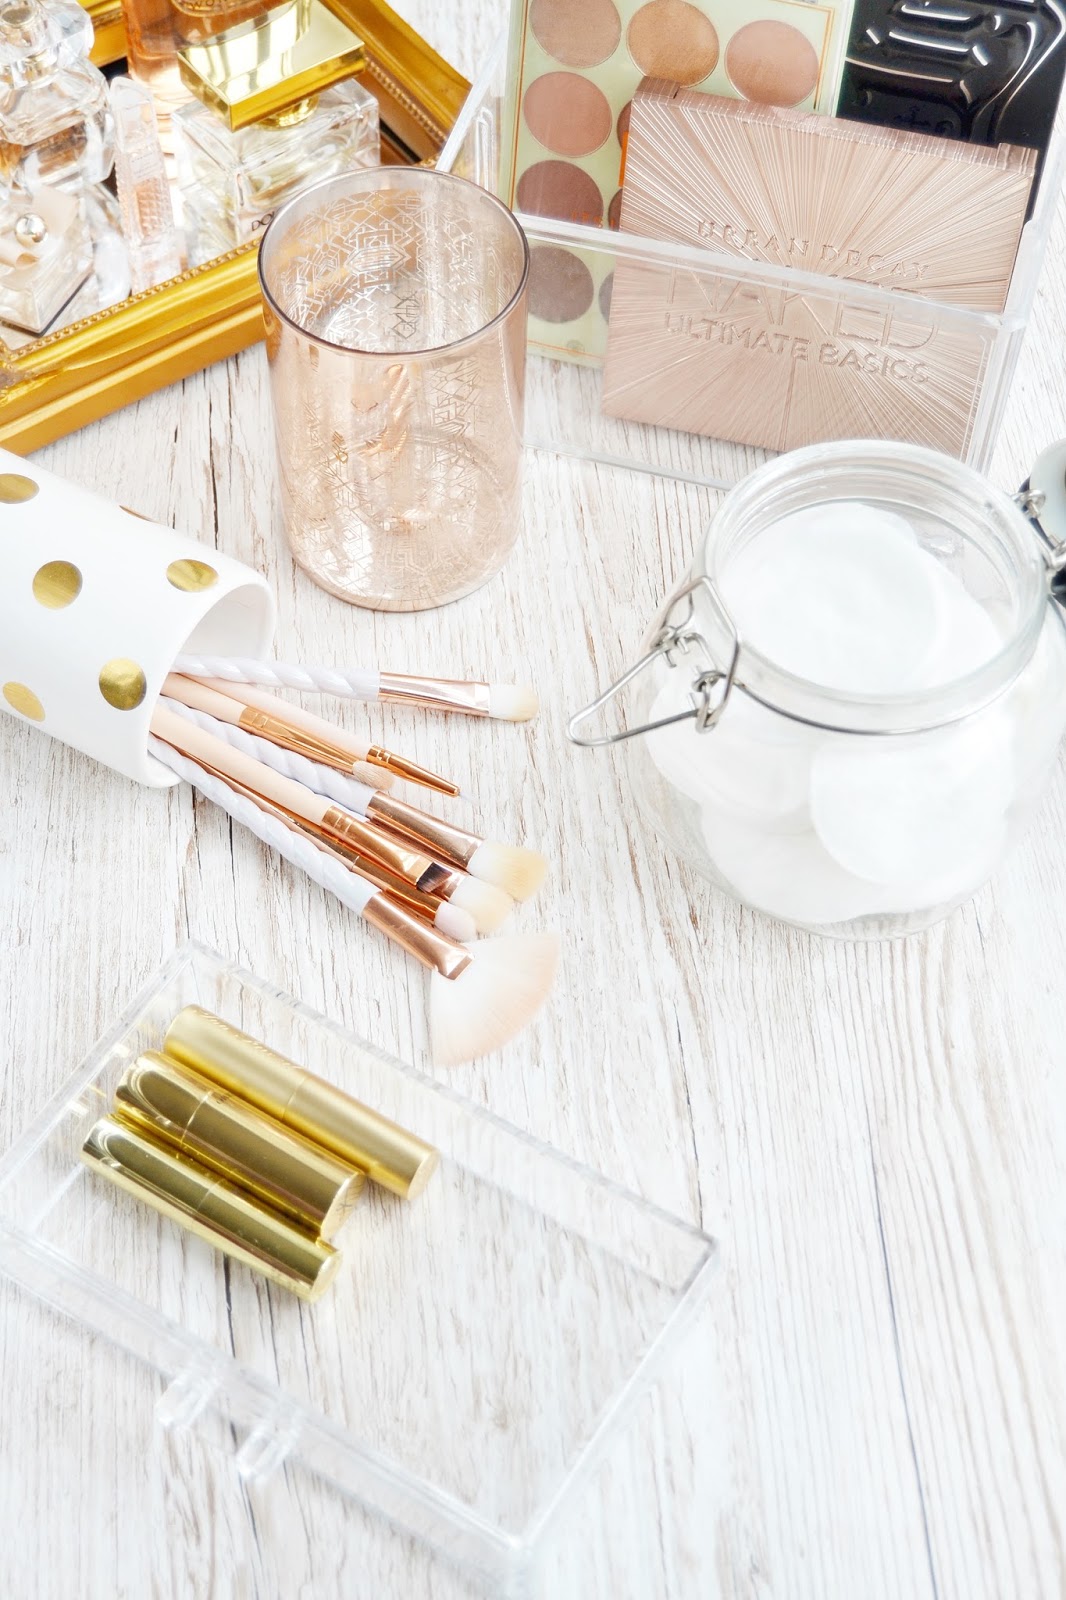
But what if you are after something more than plain acrylic makeup storage or you are simply over the rose gold trend and want to update the storage you have. Well, hopefully, I have just the finds for you with a round-up of the best gold makeup organizers around right now, plus a great DIY hack at the end! This post contains affiliate links.
I remember when I first realised the importance of an organise makeup station setup. By simply grouping products together and storing them in a few clever ways made applying makeup quicker as I knew where everything was. It also made for a neater more aesthetically pleasing dressing table! Instead of spending money, clever makeup storage ideas are where it's at and as someone with a large makeup collection, I'm hopeful I can help with that!
Below I've compiled 10 unique ways of storing makeup. From dressing table to bathroom and even secret storage in your wardrobe - I've got you covered!

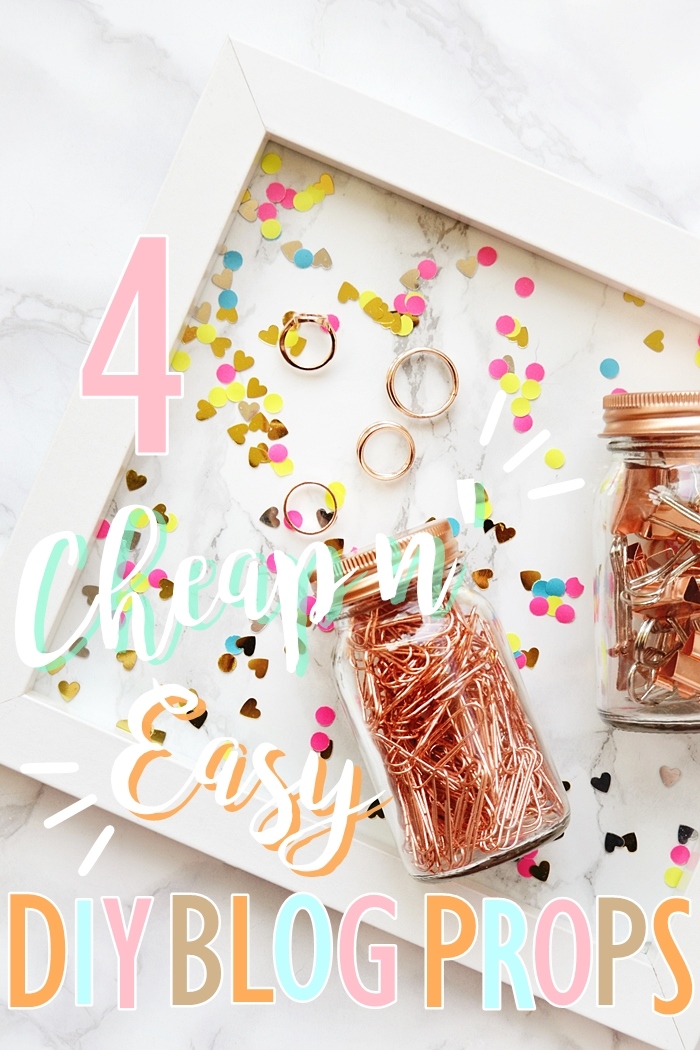
For a while now I'm been thinking I need to up my blog photography game and get a few new props. But then it came to me... why not do some DIY crafts and make my own props instead!
I don't like to blow my own trumpet, but these 4 DIY blog props turned out better than expected and literally took me no time at all! My personal favourites are the confetti ( actually fun to make!) and the DIY marble tray - let me know your favourite props in the comments!
Lets get DIY-ing!

1. DIY Hole Punched Confetti
So, this couldn't be any simpler! Grab some coloured paper or card and get hole punching with a hole puncher! Okay, I decided to get a bit fancy and threw in some wedding table decoration hearts for good measure, but you could literally cut up different shapes and have a random ol' mix of DIY multi-coloured confetti to sprinkle over blog backgrounds.
As you can see sprinkled around my quirky looking Furiously Happy book it's a lovely fun effect!
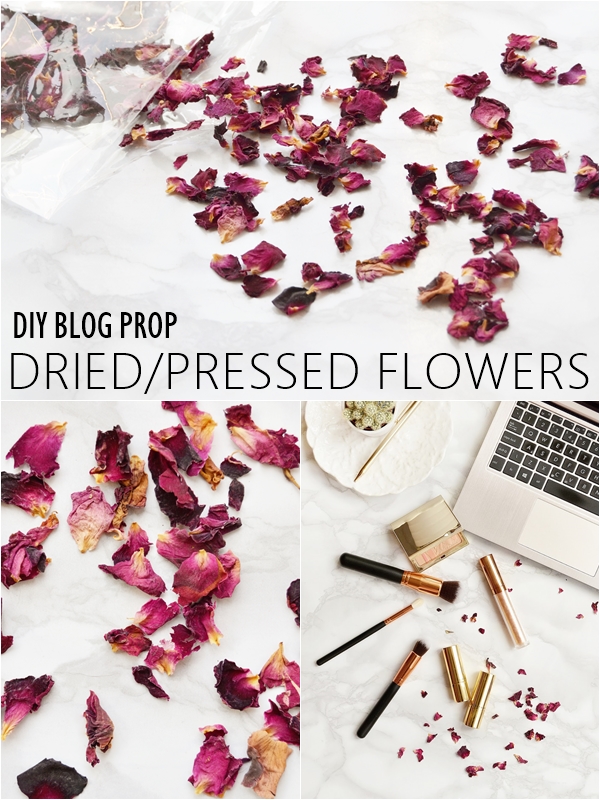
2. DIY Dried Flowers
Okay okay, so I cheated here a teeny bit.... dammit, I bought these from eBay! BUT in my defence pressing your own flowers and drying them out is definitely a craft project you could do, I just didn't have the time! You simply need either a stack of heavy books or better still, a wooden flower press. This all feels very nostalgic as me and my sister use to enjoy pressing flowers when we were children and would collect all sorts of dainty flowers from our garden - it's actually a really nice hobby/craft for any age come to think of it.
I picked up these gorgeous dried rose petals, that smell amazing, for only £2.20 (15g) on eBay here. I wasn't sure on the weight but trust me you receive more than enough!
Perfect for delicate looking blog images along side makeup or skincare products.
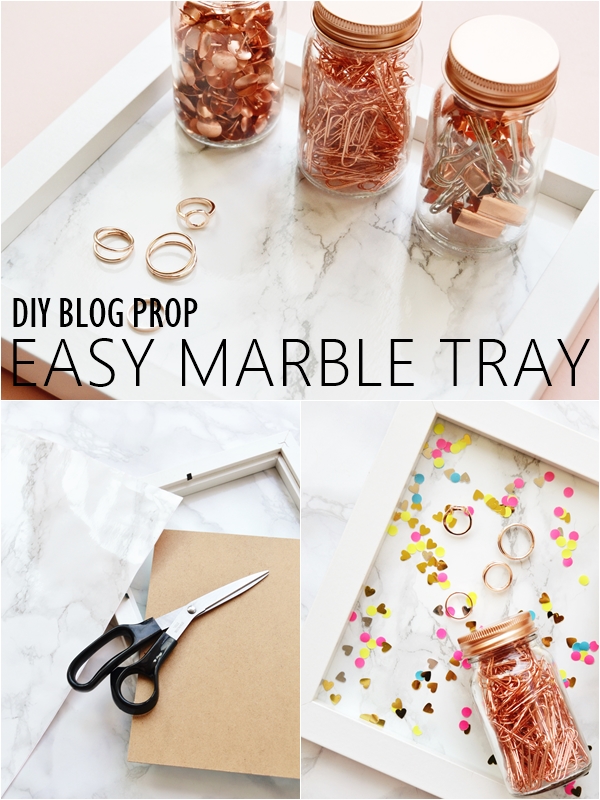
3. DIY Marble Blogger Tray
This is possibly the DIY blog prop I'm most excited to share with you as the idea came to me last week and I couldn't wait to try it out!
Taking some Marble contact paper (you can find a roll from eBay here for £6.99 or an A4 sheet (light grey) for £1.90 here. Also available in some hardware stores) simply apply it to the hard back of an old photo frame. It's totally up to you if you want to include the glass or not but to avoid reflection I decided to leave it out. This makes such an inexpensive marble tray and depending on the frame and size it can look as if you bought it!
For a confetti marble tray, simply keep the glass in, sprinkle your DIY confetti over it and then place your DIY marble backing and secure down. It really couldn't be any easier!
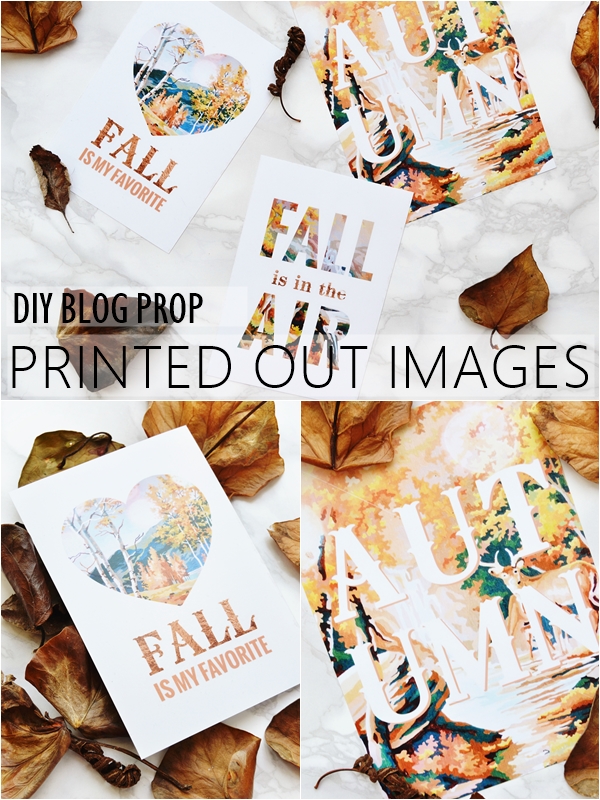
4. DIY Print-outs
Fancy some free prints to use in your blog backgrounds? Yes, me too!
Thankfully there are a lot of talented people on the Internet who like to share free things. So I simply did a search (Pinterest is good for free printables!) for some free Fall prints and found these amazing fall images (you can find them here).
You could of course just print them straight out and they would be pretty much free but I decided to get them professionally printed for only £2.50 including delivery for around 8 prints! Bargain, right? I'm done this many times with prints to hang around my home and always use Truprints (find them here!) as they offer a matte finish option which make them look much more like a print rather than a photo! Prints start from only 5p so it's an inexpensive way to get some props for your blog backgrounds and some art to frame while you're at it! Currently 15% off order as well.
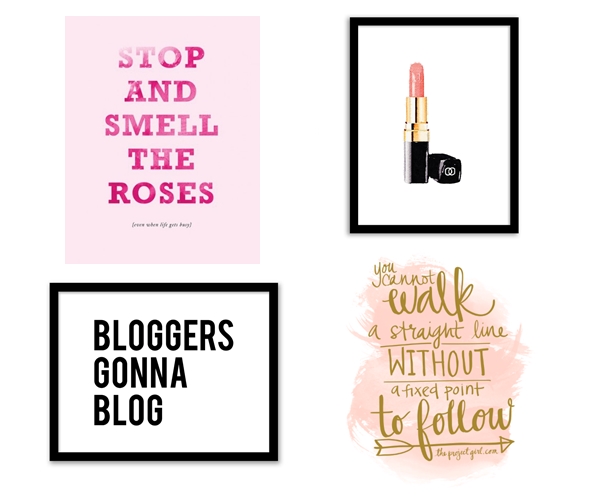
A selections of my favourite free art print printables -
Stop And Smell The Roses, Watercolour Chanel Liptick, Bloggers Gonna Blog,
You Cannot Walk A Straight Line
So there you have it! My four DIY Blog Prop ideas!
I literally feel like Martha Stewart now and want to try even more crafts!
Let me know if you make any of these - I'd love to see them!
Fee xo.

Today I thought I would do a slightly different post with all the DIY storage ideas that I have been seeing around the internet and ones that I have also thought up.
Hope some of you try out these ideas!


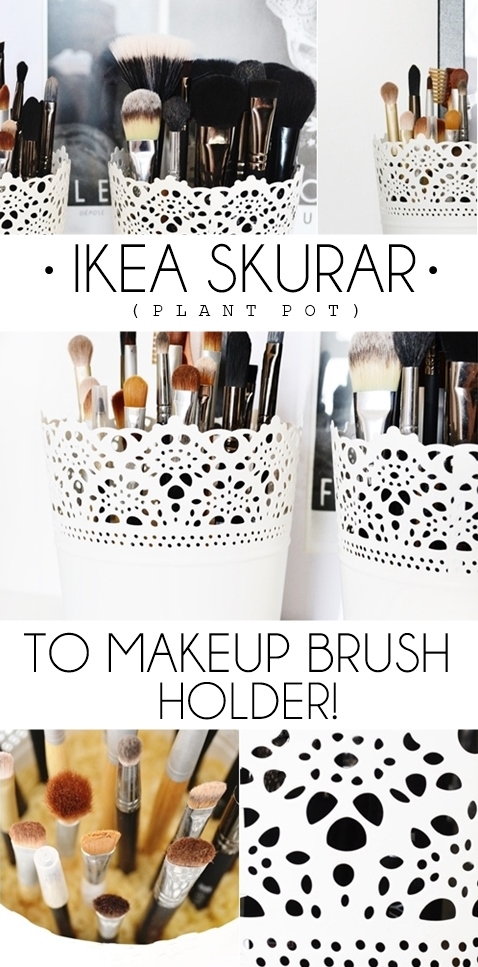
On a recent trip to Ikea I picked up three £2 Skurar Plant Pots (don't worry if you don't live near an Ikea - here's a £1.22 eBay alternative!) basically because they were pretty!
I then had a lightbulb moment of what if I store my makeup brushes in them!
As you can see this totally works and is a perfect solution for my large makeup brush collection. The only drawback is that the plant pots are quite tall, taller than my makeup brushes at least, meaning when I put my brushes into the pot they could hardly be seen.
However this problem is easily solved by using long grain dried rice in the bottom of each plant pot, so that the brushes stand up nice and high, and also separated.
However this problem is easily solved by using long grain dried rice in the bottom of each plant pot, so that the brushes stand up nice and high, and also separated.

You may want to ignore my mostly dirty brushes but I think it turned out quite well!
I filled both pots half way with dried rice and then placed in the brushes. As you can see one holder is for eye brushes and the other is for face brushes.
I filled both pots half way with dried rice and then placed in the brushes. As you can see one holder is for eye brushes and the other is for face brushes.
As for the SKURAR plant pots I really do love them. They are metal, meaning they are nice and strong and the cutout lace detail is a lovely touch. My alternative eBay find plant pots here are very similar indeed but made of plastic FYI - but still it beats walking around Ikea for hours just for plant pots, or a fab solution if your nearest Ikea store is 1242 miles away!
You could also use these plant pots to store sharpies and other bits of stationary. Really great for budget desk storage whilst still keeping it pretty!
Fee xo.

Did you see my DIY post on how to make your own holographic makeup brush holder? If you didn't know I started a little DIY series and for my second instalment I promised a homemade body scrub.
This is the scrub that I use when I don't have my beloved Soap & Glory The Breakfast Scrub and also when I want to prep my skin before fake tanning as I can make it the exact texture and level of exfoliation I want.
I am aware this does look like a food recipe! However please trust me as this does work and it's also quick and yummy to make. You can even just make enough for a single shower in a bowl if you so wish.
I am aware this does look like a food recipe! However please trust me as this does work and it's also quick and yummy to make. You can even just make enough for a single shower in a bowl if you so wish.
Now this is very basic, basic enough to actually give no measurements! It's just about adding the ingredients together bit by bit and achieving the texture of scrub you want.

What you will need - An air tight storage jar (this jar was around £2.50 from Tesco, though Kilner jars are also good), extra virgin olive oil, white and demerara sugar, vanilla extract.
- First pour your white & brown sugar into the jar and either shake up to mixture or mix together with a spoon. The main thing to note here is that the demerara sugar will give you a more coarse scrub and the white sugar will give you a softer more runny scrub. I personally fill up half of the jar with a 1:1 ratio as I like my scrub to be quite coarse as I use it on my knees and feet. Really it is all about using your judgement.
- Next slowly add the olive oil whilst mix the sugar, you want the sugar to clump together and be soaked in the oil but not so that you can see any oil. The sugar should soak it up. The best way to see if you have the right consistency take a small amount and test it on the back of the hand to see if you need any more oil.
- The last step is to add a little Vanilla Extract to the mixture. You really do only need the smallest amount to add a scent to the sugar. Here I used half a teaspoon and mix it in well.

I will admit this isn't the most sophisticated homemade product but actually that is what I like about it! There is no need to go out and buy any essential oils or a carrier oil and you also know that there are very little ingredients in this.
When using this in the shower I of course make sure my skin is damp before rubbing it over my skin and if I do want a softer more foaming scrub I add some shower gel in the palm of my hand with the scrub. The sugar body scrub can be stored in at room temperature for around 3 months, though you may need to give it a mix now and again. Of course if you do have sensitive skin then either give this a miss or only use a very fine grain of sugar.
My next DIY post will be a nail art tutorial I think!
Fee xo.
Autumn for me always feels like the start of new things - wearing warmer clothes, new TV series at the weekend, darker nights and new projects.
So I thought I would start my own DIY series as I do enjoy getting crafty. I already have a few ideas in my head and come November I can even do afew DIY gift idea for Christmas... maybe DIY mini bath bombs and homemade soap etc.
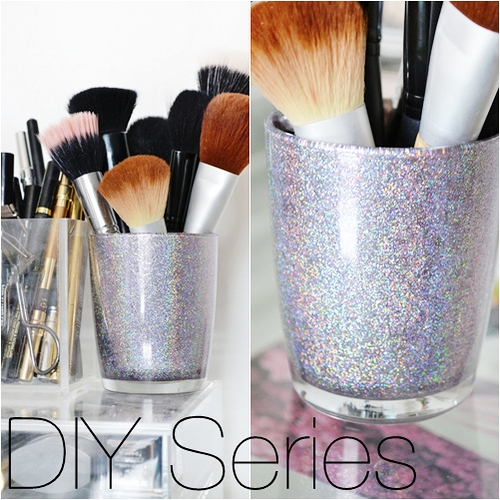
But to start off my series I thought I would do something fun and very easy! To make a holographic or glitter makeup brush holder it takes no time at all and it's something you can do whilst watching TV even. There is one key ingredient to this which I am pretty sure most makeup lovers will own! So carry on reading to find out how to make your own pretty makeup brush holder.

The pictures above probably explain it all but here are the steps I took in order to make the makeup brush holder...
1. The jar I actually used was a clean Nutella jar (the one in the first image has a pattern to the bottom but most are smooth). But you could easily you a standard glass tumbler... I just liked the curve of the Nutella jar... which I had been using as a drinking glass originally haha. After washing the jar I rubbed a cotton wool pad with some nail polish remover over the inside just to remove any grease.
2. As you can see the secret ingredient to this is nail polish! Any glitter polish will look great but you really want to go for one what is more of an opaque glitter so that you don't use up all the nail polish. Also to cut down on how much glitter nail polish I used I decided to use another nail polish in a similar shade just to fill in all the tiny gaps - I really recommend this! I must stress that while doing this it is important you keep a window open as the fumes can be quite strong!
3. First you want to pour a small amount of the glitter nail polish in to the bottom of the glass then spread it evenly on the bottom an up the sides, spreading it as thinly as you can. I then did the same up the sides of the glass, just pouring a little bit then spreading it until the whole of the inside was covered. I then quickly dried it with my hair dryer on the 'cool' setting such took a few minutes. Once it was nearly dry I added another layer of glitter nail polish, which is when it started to look really good.

4. I then dried the second coat with the hair dryer but you could leave it to air dry. Then for the final step I added a coat of metallic silver nail polish which gave it a perfect finish! So if you are going for gold glitter use a gold metallic nail polish but if you are using pink glitter as long as most of the glass is covered you could use a creme pink nail polish.
5. Leave to dry over night somewhere open as the fumes from the nail polish can be quite strong, so you don't want it in the room you are sleeping in while it is drying.
*I think it is pretty clear to see but this should only be used as a holder and NOT for candles*
Of course you aren't limited to just using the jar as a brush holder, you could use it to keep your eyeliners or lip glosses in or even on your desk for pens & pencils.
Next in my DIY series... a yummy Vanilla Sugar Body Scrub!
Fee xo.

I thought I'd share something a bit different today as aside from make-up I love interior design and just making things look pretty! But this also kind of fits in with makeup/perfume as you could place this on your dressing table to display all your perfumes on or even all your favourite lipsticks, lined up.
Plus the whole thing takes 5 minutes at the most to make and can be done on just a few pounds!

Firstly you need to decide what you want your tray to be for and what size. Then when you have decided, you need to look for an appropriate image - look and size wise. The first tray I did was just to put some jewellery on and other bits and bobs so I tore out an advert in Marie Claire by Ralph Lauren that I really liked. But as a lot of ads do have writing on then it may be better going to B&Q or a DIY shop and getting a few wallpaper samples that have a design on that you like.
Next you need to buy or find a frame - Size wise I would say nothing below A4 size as it will look like a photo frame. But if you are wanting a tray for your dressing table then a long rectangular aperture frame would look perfect or any thing with a lip/edge.

Next you need to remove all hooks and arms from the back of the frame if it has any - so that the frame will lie down flat and not rock at all. At this point you can also paint the frame if you don't like the colour of it. During all of this I would suggest you take the glass out of the frame as you don't want to crack it whilst removing the hooks etc.
Once you have your frame all ready, lay the sheet of glass down on the BACK of the image and if it is too big draw around the glass and cut the image to size that way. There really in no point in messing with measuring it.

Extra Idea
Want a mirrored perfume tray or just a pretty mirror for your dressing table?
I have done this a few times and it so easy and cheap! If instead of an image/pattern you want a mirror, then take the glass from the frame to a glass merchants or you can ring them for a quote (but make sure to have the measurements to hand) and they will cut you the same size but in mirror glass, which you can take home and put in the frame (minus the original glass of course)!
I have done this a few times and it so easy and cheap! If instead of an image/pattern you want a mirror, then take the glass from the frame to a glass merchants or you can ring them for a quote (but make sure to have the measurements to hand) and they will cut you the same size but in mirror glass, which you can take home and put in the frame (minus the original glass of course)!
It really is so simple but as you can see just a paper printed advert looks so different under a sheet of glass! Plus you will always be able to change it for free whenever you get bored of it.
Or if you don't want to use it as a tray anymore you can...

Just propping it up behind objects can really add a bit of interest and create a nice back drop for ornaments... or of course if you have replaced the glass with mirror glass you can always re-add a hook and hang it, especially if it's a decorative frame!
So with only a few pounds you can really create something this is versatile and swish looking!
Fee xo.
Subscribe to:
Posts (Atom)